Replacing the Battery in a Fiio X1
Things you’ll Need:
0.8 Number 2 Pentanode Screwdriver. These are most commonly found in sets for taking apart apple products and can be bought for $8 (amazon or the bay),
A replacement battery – this is the Sparkfun.com 2000 mAh battery PRT-13855 ($13)
A soldering iron – you don’t need an expensive solder station for this job as long as the iron gets good and hot and has a good fine tip as shown below.
The pentanode is tiny so is a good reference for the soldering tip. Look at the size hole in the screws at the base of the case of the X1 and the tip of your iron should fit in one.
What to do: FIRST: TURN THE PLAYER OFF. I am not responsible if you do something dumb and break the player. Remember, be gentle and take it easy. Force is not needed for any operation in this process.
At the base of the player, there are two very tiny screws remove them with the pentanode #2 driver and store them so they do not get lost. (I use a small container with a piece of double faced tape in the bottom to hold things even if it gets bumped.)
Once the screws are removed lift the lower edge of the back about 1 inch. Do not lift more than this as the battery is attached to the back. Once the lower edge is lifted, slide the back toward the bottom to release the hinges at the top. Flip the lid gently and then pry the battery off the lid.
Slit the black casing carefully and remove it from the battery. This exposes the connections and while the 4 wires make it look like the batteries don’t match, you’ll be able to see that the wires are paired and actually only two connections are made.
Here is the pad on the new battery for comparison.
Pre heat your soldering iron and remove and clean the wires from the old battery. High heat for a short time is much less likely to damage a battery than extended heat so don’t be afraid to set the iron on high.
Once the old battery is completely free of the player, set it aside for recycling. It is illegal to dispose of Li batteries in household trash in most areas so find a recycler that takes batteries.
On the new battery, fold back the yellow protective film being sure to preserve it as you’ll need it later. When removing the wires from the new battery, I always remove one, then resolder the replacement so I never have both wires detached. This avoids the possibility of wiring the battery in reverse and destroying the player by reversing the polarity.
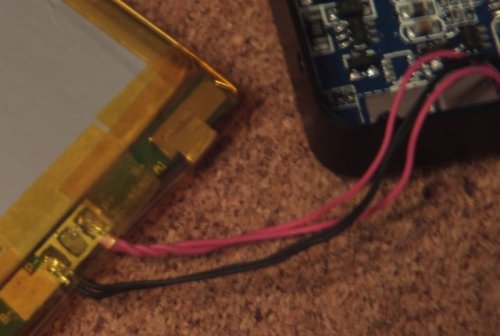
This picture shows the red connector from the player attached and the black wire that came with the new battery still attached. Next step is to remove the black wire and then attach the black wire from the player.
Once the wires are solidly attached, fold the protective film back in position over the contact pad.
In order to fit the battery in and close the case, remove the black buffer pad shown in the lower left of the picture below. The new cell is slightly thicker so doesn’t require the extra padding to maintain position. Also watch and make sure the wires do not sit near the usb port as they can slip between the port and housing and block the USB port.
Now you are ready to reattach the battery to the backplate and close up the case. Be careful to position the battery so the case does not pinch it as rupturing a li cell can be a fatal mistake. Before putting the tiny screws back in, now is time to turn the player on to make sure closing the case didn’t break a solder joint on the battery. If the player works, time to put the screws back in and enjoy your revitalized X1. If not, time to open it back up and check your connections to make sure they are solid.


